|
Relative Pitch Guitar Tuning Methods
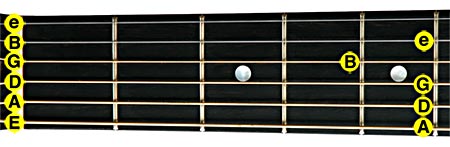
SIDEBAR: Start-Playing-Guitar.com was redesigned and re-launched on November 28, 2007. As a result, this page was merged into other articles, including: Tune Your Guitar. You can alco click here to visit the new Home Page, then look at the navigation bar on the left side of the page for all of the lessons. The term 'Relative Pitch Guitar Tuning Methods' refers to all tuning methods where your strings are tuned using one or more other strings. Once complete, the pitches sound correct relative to each other. They may or may not be in tune with another guitar or other instrument. Perfect Pitch Guitar Tuning methods tune each string to identically match a reference pitch. If you read the Perfect Pitch Tuning Methods page you'll find out that even that may or may not match other instruments! I describe three relative pitch tuning methods. They are listed from easiest to more difficult. The also happen to be listed from least accurate to most accurate. PrerequisiteBefore you can use any of these Relative Pitch Guitar Tuning Methods you must tune one string to a known pitch. You can do this with a Chromatic Tuner of your own, a tuning fork, a pitch pipe, another instrument... anything that accurately produces one of the guitar string notes.If you an online tuner, Get-Tuned.com, is straightforward. For an explanation of the strings on a standard guitar (note names, string numbers, the pitch associated with each one) see Guitar String Names . Each method below assumes that your 6th string (the thickest string, which produces the lowest note) is in tune. Relative Pitch Guitar Tuning to Adjacent StringsRelative Pitch Guitar Tuning with adjacent strings has three distinct advantages: it's easy to remember; it's easy to compare identical notes; and, it provides good relative tuning rather quickly.The disadvantages are: it's up to you to determine when two notes sound the same; and, slight tuning problems get worse as you move from string to string. Use the A-note of the lower E-string (in tune from the prerequisite step) to tune the A-string. Take a look at the photo of the fretboard (below). The lower E-string is shown at the bottom of the photo. The location of the A-note is shown on the fifth fret of that string.
Place your finger on the fifth fret of the lower E-string and pluck it. Listen carefully for a second, then pluck the open A-string. If the open A-string sounds lower, then tune the A-string up. If it sounds higher, then tune it down. (Do not adjust the E-string.) The first time you do this it may be confusing, but you'll very quickly get the hang of it. Repeat until the two notes sound alike. Tune the D string by pressing down at the fifth fret of the A-string (the orange cirle labelled "D" in the above photo shows you where to press). When you pluck the A-string it will produce a D note. Listen for a second, then pluck the open D-string. Turn the tuning keys to adjust the D string. Repeat until the two notes sound alike.
You'll tune the remaining strings using a similar process... careful, though, with the B-string... you'll use the fourth-fret of the G-string for that one. Tune the G string by pressing down on the fifth fret of the D string. Now, tune the B string by pressing down on the fourth fret of the G-string. Finally, tune the upper E string by pressing down on the fifth fret of your in-tune B string. Relative Pitch Guitar Tuning to One StringThe greatest disadvantage of the Relative Pitch Guitar Tuning to Adjacent Strings method (tuning problems getting passed from string to string) is mostly eliminated by using a SINGLE string for tuning the other five. In addition, this method helps you learn several notes on TWO of your strings (as you'll see in a minute).On the down side, some find moving up and down the fretboard confusing at first. Also, for the last three strings you have to tune up one octave... the notes will not be exactly alike. Some find it harder to tune this way. Stick with it, though, the advantages of this Relative Pitch Guitar Tuning method are worth the extra effort! Since your lower E-string is in tune (see Prerequisites, above) we'll use it to tune the other five. To tune the A-string, press on the fifth fret of the low E-string (to produce an A-note). Adjust the pitch of the A string until the two notes match. Tune the D-string by pressing on the tenth-fret of the E-string. Play both strings, adjusting the D-string tuning, until they sound the same. Take your time with the next two notes, and do NOT tune them to sound exactly the same. Tune them so that the string you are tuning is one octave higher than the note played on the low-E string. SIDEBAR: It's really not as hard as it might sound, but it takes some getting used to. Tune the G string by pressing on the third fret of the low-E string. Pluck the low E-string and listen for a second, then pluck the G-string. It's important that you tune the G string ONE OCTAVE HIGHER than the sound produced by the low E-string. It takes a little practice, but once you hear the difference, it's easy! SIDEBAR: If you have a hard time hearing one octave higher, then first tune using the Relative Pitch Guitar Tuning to Adjacent Strings method, then come back and fine-tune using this method. Tune the B-string by pressing on the seventh fret of the low E-string, then plucking the open B-string. Once again, you are tuning the B-string ONE OCTAVE HIGHER than the sound produced by the low E-string. Finally, tune the high E-string by pressing on the 12th fret of the low E-string. Tune these so that they sound alike, not one octave higher. Congratulations, by they way, you just learned the fretboard location of sixteen notes of your guitar! How? Well, now you know the open notes of each string (E, A, D, G, B, E... that's six). You also know the third, fifth, seventh, tenth, and twelfth fret notes of the low E-string (these are G, A, D, B, E... five more notes). And, since the high E-string frets match the low E-string frets (they are simply one octave apart) you automatically know five more notes, for a total of sixteen! Relative Pitch Guitar Tuning with Harmonic TuningMost people begin with one of the first two Relative Pitch Guitar Tuning methods, then use this one after they learn how to play harmonics. So, these instructions are brief.You can find a brief explanation of Harmonic Tones in the Glossary , if you need it. Advantages of the Relative Pitch Guitar Tuning with Harmonic Tuning: Your reference note rings longer, allowing more time to adjust the pitch of the out-of-tune string. It's also a fast method. Disadvantages: It can take some practice for a new player to produce a harmonic tone. The volume of your harmonic tone (on an instrument that is not amplified) is not as loud as a plucked open string, so tuning with harmonics in a noisy environment is difficult. To tune the A-string (the E-string is already in tune if you followed the Prerequisite), play the twelfth fret harmonic on the low E-string, then play the seventh fret harmonic on the A-string. Adjust your A string to match the pitch of the E-string. Continue in the following pattern to complete Relative Pitch Guitar Tuning with Harmonic Tuning... The 12th fret harmonic of the A string is used to tune to the 7th fret harmonic of the D string. Go from Relative Pitch Guitar Tuning to Start Playing Guitar Home Page
|